用Nape创建绳索效果
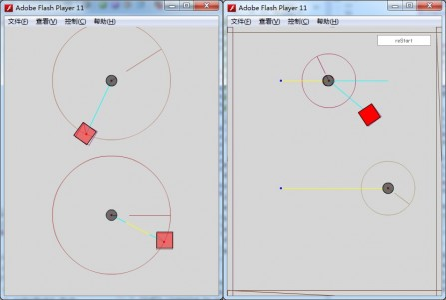
在DistanceJoint和LineJoint关节里,我一直都在试图模拟《割绳子》里的绳子效果,如下图所示。
虽然样子是有了,但是小球不想是被系在绳子上,更像是被顶到了一个木板上。今天我们将在Nape中用多个PivotJoint关节模拟真实的绳索效果。
我想象中的绳索模型是这样子的。用一个圆形刚体作为绳子的起首端startBody,从这个首端刚体开始,用PivotJoint连接一个段刚体segmentBody,然后再用一个新的PivotJoint关节将第2个段刚体与第1个段刚体连接起来,以此类推。最后,将最后一个段刚体链接到绳索是末端刚体上endBody。设置一个首和尾端刚体的好处在于,可以通过这个两个刚体,轻松的固定绳索的两端,或者将其他刚体链接到绳索的末端。
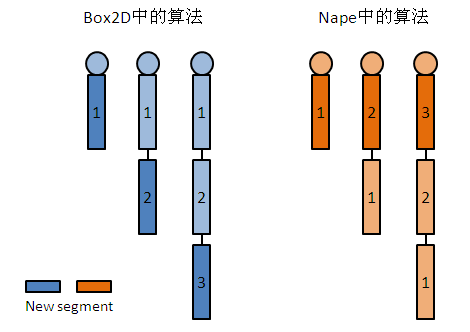
与Box2D绳索效果一节的思路不同,这一次我没有从绳索的末端添加刚体,而是从首端开始插入刚体,如下图所示:
这样做的话,就不用每次根据绳索的长度重新计算新增段刚体的坐标了。这样不管是新增或删除段刚体就可以很轻松的实现了。
另外一点就是节点的控制。我分为两部份,一部份是首末端与刚体链接的节点,一部份是段刚体之间的连接的节点。如下图所示。
如左图所示,在添加第1个段刚体时,用两个PivotJoint关节joint1和joint2将其连接到首末刚体上,节点分别是首末刚体的坐标。
在添加第2个段刚体时,首先新建一个PivotJoint将其连接到首刚体上,节点是首刚体的坐标。然后将前一个关节p1的body1由原来的startBody改为新增的段刚体b2,anchor1设置为joint1.anchor的相对于b2的坐标。重复上的步骤可以添加更多的段刚体,让绳索变的更长。
把LineJoint中的示例用上面的绳索实现,就更像《割绳子》里的效果了。同样的,按下空格键可以”剪断”绳索,当小球掉到下面的节点范围内,会自动创建新的绳索。
[swfobject]892[/swfobject]
完整的代码如下:
package {
	import nape.space.Space;
	import ldEasyNape.LDEasyNape;
	import nape.constraint.PivotJoint;
	import nape.constraint.ConstraintList;
	import nape.phys.BodyList;
	import nape.phys.Body;
	import nape.geom.Vec2;
	import nape.phys.Compound;
	import flash.display.Graphics;

	/**
	 * @author yangfei
	 */
	public class RopeJoint {

		private var rope : Compound;
		private var segmentNum : uint;
		private var segmentHeight : Number = 30;
		private var segmentWidth : Number = 2;

		private var startPoint : Vec2;
		private var endPoint : Vec2;
		private var startBody : Body;
		private var endBody : Body;

		private var bodyList : BodyList;
		private var jointList : ConstraintList;

		public function RopeJoint(body1:Body, body2:Body, segmentSize:Number=20, ropeLenth:Number=0) {
			startBody = body1;
			endBody = body2;
			startPoint = startBody.position;
			endPoint = endBody.position;
			if(ropeLenth==0){
				ropeLenth=Vec2.distance(startPoint, endPoint);
			}
			segmentNum = Math.ceil(ropeLenth/ segmentHeight);
			segmentHeight=segmentSize;

			bodyList = new BodyList();
			jointList = new ConstraintList();

			rope = new Compound();
			init();
		}
		private function init():void{
			var joint : PivotJoint = new PivotJoint(startBody, endBody, Vec2.weak(), Vec2.weak());
			joint.compound = rope;
			jointList.unshift(joint);

			for(var i:int = 0; i<segmentNum; i++){
				addSegment();
			}
		}
		// used in addSegment();
		private var px : Number;
		private var py : Number;
		private var joint : PivotJoint;
		private var segment : Body;
		private var firstJoint : PivotJoint;

		public function addSegment():void{
			//定义刚体的初始坐标
			px = startPoint.x;
			py = startPoint.y + segmentHeight/2;
			//创建刚体
			segment = LDEasyNape.createBox(px, py, segmentWidth, segmentHeight);
			segment.shapes.at(0).sensorEnabled = true;
			//如果不是第一节刚体,则设置新刚体为第一节刚体的坐标
			if(bodyList.length>0){
				segment.position.set(bodyList.at(0).position);
				segment.rotation = bodyList.at(0).rotation;
			}
			//调整第一个关节
			firstJoint = jointList.at(0) as PivotJoint;
			firstJoint.body1 = segment;
			firstJoint.anchor1 = Vec2.weak(0, segmentHeight/2);
			//创建新的关节,将新增刚体连接到body1上
			joint  = new PivotJoint(startBody, segment, Vec2.weak(), Vec2.weak(0,-segmentHeight/2));
			joint.stiff=true;
			joint.ignore = true;
			joint.compound = rope;

			bodyList.unshift(segment);
			jointList.unshift(joint);

		}
		public function removeSegment():void{
			if(jointList.length < 5) return;
			bodyList.shift().compound = null;
			jointList.shift().compound = null;

			var joint : PivotJoint = jointList.at(0) as PivotJoint;
			joint.body1= startBody;
			joint.anchor1 = Vec2.weak();
		}
		public function set space(value : Space):void{
			rope.space = value;
		}
		public function get space():Space{
			return rope.space;
		}
		public function set active(value : Boolean):void{
			var firstJoint : PivotJoint = jointList.at(0) as PivotJoint;
			var lastJoint : PivotJoint = jointList.at(jointList.length-1) as PivotJoint;
			firstJoint.active=value;
			lastJoint.active=value;
		}
		public function get active():Boolean{
			var firstJoint : PivotJoint = jointList.at(0) as PivotJoint;
			return firstJoint.active;
		}
		public function set body1(value : Body):void{
			var joint : PivotJoint = jointList.at(0) as PivotJoint;
			joint.body1=value;
			startBody = value;
			startPoint = startBody.position;
		}
		public function set body2(value : Body):void{
			var joint : PivotJoint = jointList.at(jointList.length-1) as PivotJoint;
			joint.body2=value;
			endBody = value;
			endPoint = endBody.position;
		}
		public function drawLine(graphic : Graphics):void{
				graphic.clear();
				if(!active) return;
				graphic.lineStyle(5);
				graphic.moveTo(startPoint.x, startPoint.y);

				var px: Number, py:Number;
				var ax: Number, ay:Number;

				var i:int=1;
				var body: Body;
				var joint: PivotJoint;

				for(;i<jointList.length;i++){
					joint = jointList.at(i) as PivotJoint;
					body = joint.body1;

					px=body.position.x;
					py=body.position.y;
					ax=body.localPointToWorld(joint.anchor2).x;
					ay=body.localPointToWorld(joint.anchor2).y;
					graphic.curveTo( ax, ay, px, py);
				}
				graphic.curveTo(joint.body2.position.x,joint.body2.position.y,endPoint.x, endPoint.y);

		}
	}
}
值得注意的是,因为新增的段刚体都是从首端开始的,所以我下意识的用unshift将刚体添加到了bodyList和jointList数组的第1个位置,这样访问起来,就不用考虑绳索的长度了。
下载源文件
。
联系作者


Hi there, I just want to say thank you! This isn’t as easy to follow as I hoped for, but the source code you provided has been absolutely fantastic help. Thanks!
为啥这里创造出来的绳索都自带弹性?.stiff明明已经设置成true了…
是个好问题,我一直也没注意,回头研究一下,谢谢指正!
辛苦!